Category Archives: Favorites

Roasted Sweet Potatoes

These are incredible. I highly recommend making them! You can fit about 4 medium to large ones on one sheet pan.

Roasted Sweet Potatoes

Prep Time10 minutes
Cook Time45 minutes
5 minutes
Total Time1 hour
Course: Side Dish
Cuisine: American, California
Keyword: Basics, Inspired by New York Times, Leftovers, Potatoes, Roasted Vegetables
Servings: 4 servings
Calories: 354kcal

Ingredients

  • 4 large sweet potatoes
  • 2 tbsp avocado oil
  • 2 tsp salt

Instructions

  • Scrub the sweet potatoes. Cut them in half, lengthwise.
  • Place on a foil-covered sheet pan. Drizzle with avocado oil and salt and mix it up to cover the sweet potatoes thoroughly.
  • Put the sheet pan in the oven. Heat to 425°F (after you place the pan into the oven). Bake for 30-45 minutes until softened and the bottom is blackened and caramelized some.

Notes

Makes 4 servings

Nutrition

Calories: 354kcal | Carbohydrates: 68g | Protein: 5g | Fat: 7g | Saturated Fat: 1g | Polyunsaturated Fat: 1g | Monounsaturated Fat: 5g | Sodium: 1350mg | Potassium: 1146mg | Fiber: 10g | Sugar: 14g | Vitamin A: 48236IU | Vitamin C: 8mg | Calcium: 103mg | Iron: 2mg
Nutrition Facts
Roasted Sweet Potatoes
Amount Per Serving
Calories 354 Calories from Fat 63
% Daily Value*
Fat 7g11%
Saturated Fat 1g6%
Polyunsaturated Fat 1g
Monounsaturated Fat 5g
Sodium 1350mg59%
Potassium 1146mg33%
Carbohydrates 68g23%
Fiber 10g42%
Sugar 14g16%
Protein 5g10%
Vitamin A 48236IU965%
Vitamin C 8mg10%
Calcium 103mg10%
Iron 2mg11%
* Percent Daily Values are based on a 2000 calorie diet.

Jar Meal: Italian Barley (or Farro) Soup

Jar Meal: Italian Barley (or Farro) Soup

Prep Time10 minutes
Cook Time40 minutes
Total Time50 minutes
Course: Dinner
Cuisine: California, Italian
Keyword: Barley, Dry Beans, Farro, Quick, Quinoa, Vegan
Servings: 6 servings
Calories: 201kcal

Ingredients

  • 1 cup pearled barley
  • 3 tbsp pre-washed quinoa
  • 3 tbsp dried mung beans
  • tbsp dried minced onions
  • 1 tbsp dried basil
  • ½ tbsp dried thyme
  • ½ tsp dried oregano
  • ½ tsp fine grains salt plus more to taste
  • ¾ tsp dried chili flakes
  • 1 tbsp bouillon powder
  • cups water
  • 14 oz crushed tomatoes

Instructions

  • Layer all of the ingredients into the jar. Set aside for up to six months.
    1 cup pearled barley, 3 tbsp pre-washed quinoa, 3 tbsp dried mung beans, 1½ tbsp dried minced onions, 1 tbsp dried basil, ½ tbsp dried thyme, ½ tsp dried oregano, ½ tsp fine grains salt, ¾ tsp dried chili flakes, 1 tbsp bouillon powder

Make Soup

  • Add 5½ cups water and 14 oz crushed tomatoes and the contents of the jar to a large Dutch oven or pot. Simmer over medium or medium-low heat for 35 to40 minutes. You want heat that produces steady, small, concurrent bubbles. You can cook either covered or uncovered, or a mix. If you cook uncovered, be sure the water level remains sufficient – ingredients should always be covered by liquid, and if not, add ½ cup of water at a time and let it come to a steady boil again before adding more water. If you cook fully covered, I'd recommend a final five minutes uncovered and at a slightly higher heat level once everything is nearly cooked through. Turn off the heat once the barley and mung beans have cooked through, which you can test by tasting the barley, which should end up chewy and not stiff. If you want to add any kale or broccoli, add just a few minutes before the soup is done cooking.
  • To serve, you can drizzle with a bit of olive oil, and/or top with cheese (mozzarella, Parmesan, etc.).

Notes

Makes six servings, especially with added fat from olive oil or cheese

Nutrition

Calories: 201kcal | Carbohydrates: 42g | Protein: 7g | Fat: 2g | Saturated Fat: 0.4g | Polyunsaturated Fat: 1g | Monounsaturated Fat: 0.2g | Sodium: 351mg | Potassium: 469mg | Fiber: 9g | Sugar: 4g | Vitamin A: 254IU | Vitamin C: 8mg | Calcium: 80mg | Iron: 4mg
Nutrition Facts
Jar Meal: Italian Barley (or Farro) Soup
Amount Per Serving
Calories 201 Calories from Fat 18
% Daily Value*
Fat 2g3%
Saturated Fat 0.4g3%
Polyunsaturated Fat 1g
Monounsaturated Fat 0.2g
Sodium 351mg15%
Potassium 469mg13%
Carbohydrates 42g14%
Fiber 9g38%
Sugar 4g4%
Protein 7g14%
Vitamin A 254IU5%
Vitamin C 8mg10%
Calcium 80mg8%
Iron 4mg22%
* Percent Daily Values are based on a 2000 calorie diet.

Red Beans and Rice

This is a delicious version of red beans and rice, and while it takes a little bit to make it, it makes so much and it saves so well that it’s a valuable recipe to put into rotation.

Red Beans and Rice

Delicious variation on a classic, which I've modified to use brown rice and to match my preferred ways to cook beans and rice.
Prep Time1 hour 30 minutes
Cook Time30 minutes
Soaking Time6 hours
Total Time8 hours
Course: Dinner, Lunch
Cuisine: California, Southern, Vegan
Keyword: Dry Beans, Rice, Vegan
Servings: 8 servings
Calories: 477kcal

Ingredients

Beans

  • 3 tbsp olive oil
  • 1 yellow or white onion chopped
  • 1 green bell pepper chopped
  • 1 celery stalk chopped
  • 2 tsp Creole seasoning salt-free preferred
  • 1 tsp Spanish smoked paprika aka pimenton
  • 1 lb dried red beans Domingo Rojo, Hidatsa Red, or Kidney
  • 3.5 cups vegetable broth low sodium
  • 1 bay leaf
  • 2 tsp soy sauce
  • 2 tsp Cholula or other hot sauce

Rice

  • 1 tbsp neutral vegetable oil
  • 1 large yellow onion diced
  • 2 tbsp unsalted vegan butter or dairy butter if not aiming for vegan
  • 1 bay leaf
  • 1 tsp kosher salt
  • 2 cups brown jasmine rice
  • 3.5 cups vegetable broth low sodium
  • 1 cup chives thinly sliced for serving

Instructions

Rice

  • Pour the 1 tbsp neutral vegetable oil into a saucepan over medium-high heat. Add the 1 large yellow onion, 2 tbsp unsalted vegan butter, 1 bay leaf, and 1 tsp kosher salt and cook, stirring frequently, until the onion is soft, 6 to 8 minutes. Add the 2 cups brown jasmine rice and stir to coat.
  • Add the mixture to the rice cooker. Stir in the 3.5 cups vegetable broth. Set the rice cooker to cook brown rice and leave until beans are complete.

Beans

  • Soak the 1 lb dried red beans for 6-10 hours in a 1.5% salinity solution. Drain and rinse.
  • Pour the 3 tbsp olive oil into the Instant Pot and heat on saute. Add the 1 yellow or white onion, 1 green bell pepper, and 1 celery stalk. Saute until softened and fragrant. Add the 2 tsp Creole seasoning and 1 tsp Spanish smoked paprika.
  • Add the soaked beans, 3.5 cups vegetable broth, and 1 bay leaf. Turn Instant Pot to pressurize and go to high pressure for 5 minutes. Allow pressure to release naturally for 5 minutes, then release the rest of the way.
  • Check the beans. If very well cooked (you want them fully soft), you can then move to the next step. If not, continue to cook either by bringing back to pressure for 1-5 minutes, or just by boiling on saute.
  • Str in the 2 tsp soy sauce, 2 tsp Cholula or other hot sauce, and any salt if necessary.

Serving

  • Serve the beans in bowls with a scoop of rice in the center and sprinkle the 1 cup chives on top. Pass more hot sauce at the table.

Notes

Makes 8 servings

Nutrition

Calories: 477kcal | Carbohydrates: 77g | Protein: 17g | Fat: 12g | Saturated Fat: 3g | Polyunsaturated Fat: 3g | Monounsaturated Fat: 6g | Trans Fat: 0.1g | Cholesterol: 8mg | Sodium: 1210mg | Potassium: 970mg | Fiber: 11g | Sugar: 5g | Vitamin A: 1011IU | Vitamin C: 20mg | Calcium: 73mg | Iron: 5mg
Nutrition Facts
Red Beans and Rice
Amount Per Serving
Calories 477 Calories from Fat 108
% Daily Value*
Fat 12g18%
Saturated Fat 3g19%
Trans Fat 0.1g
Polyunsaturated Fat 3g
Monounsaturated Fat 6g
Cholesterol 8mg3%
Sodium 1210mg53%
Potassium 970mg28%
Carbohydrates 77g26%
Fiber 11g46%
Sugar 5g6%
Protein 17g34%
Vitamin A 1011IU20%
Vitamin C 20mg24%
Calcium 73mg7%
Iron 5mg28%
* Percent Daily Values are based on a 2000 calorie diet.

Tofu Katsu with Quinoa and Lemon-Tahini Sauce

This is fantastic and not too difficult!

Tofu Katsu with Quinoa and Lemon-Tahini Sauce

Prep Time30 minutes
Cook Time30 minutes
Total Time1 hour
Course: Dinner
Cuisine: California
Keyword: Quinoa, Tofu
Servings: 4 servings
Calories: 861kcal

Ingredients

Tofu Katsu

  • 5 tbsp canola oil
  • 0.33 cup cornstarch
  • 2 large eggs beaten
  • 1.5 cups panko bread crumbs
  • 2.25 tsp granulated onion
  • salt and pepper
  • 1 lb extra firm tofu pressed, cut about ¼-inch thick, into 12 equal slices
  • 12 oz shiitake mushrooms stemmed and sliced ½-inch thick (4 packed cups)

Quinoa

  • 1 cup quinoa rinsed well and drained
  • 0.33 cup tahini
  • 0.33 cup canola oil
  • 0.25 cup lemon juice
  • 2 tbsp Dijon mustard
  • 2 tsp soy sauce
  • 0.75 tsp grated garlic about 1 large clove

Instructions

  • Make the katsu: Heat oven to 425 degrees. Grease 2 large rimmed baking sheets with the oil. Put cornstarch, eggs and bread crumbs in three separate shallow bowls, and add 3/4 teaspoon of the granulated onion to each bowl. Season all with salt and pepper and mix well. Add 3 tablespoons oil to the bread crumbs and mix well.
  • Working with one piece at a time, dust tofu in cornstarch, then dredge in egg, shaking off excess. Press in bread crumbs to evenly coat. Arrange on one baking sheet, and transfer to oven. Bake until golden and crisp, 15 minutes.
  • Place mushrooms on second baking sheet, season with salt and pepper and toss with the remaining 2 tablespoons oil. Bake until golden, 12 minutes.
  • Make the quinoa: Meanwhile, in a medium saucepan, combine quinoa with enough water to cover by 2 inches. Bring to a boil and cook until the quinoa is tender, about 8 minutes. Drain, then return quinoa to the pan. Cover and let stand for 10 minutes; fluff into a large bowl.
  • In a small bowl, combine tahini, oil, lemon juice, mustard, soy sauce, garlic and 1/2 cup plus 2 tablespoons of water. Whisk together and season with salt and pepper.
  • To the quinoa, add mushrooms, cauliflower, parsley and 1 cup of the dressing and mix well. Season with salt and pepper.
  • Divide quinoa in bowls and top with tofu. Serve with remaining sauce for drizzling on tofu and lemon wedges, if desired.

Notes

Makes 4 servings

Nutrition

Calories: 861kcal | Carbohydrates: 68g | Protein: 27g | Fat: 56g | Saturated Fat: 6g | Polyunsaturated Fat: 18g | Monounsaturated Fat: 29g | Trans Fat: 0.2g | Cholesterol: 93mg | Sodium: 1703mg | Potassium: 887mg | Fiber: 8g | Sugar: 5g | Vitamin A: 160IU | Vitamin C: 7mg | Calcium: 151mg | Iron: 6mg
Nutrition Facts
Tofu Katsu with Quinoa and Lemon-Tahini Sauce
Amount Per Serving
Calories 861 Calories from Fat 504
% Daily Value*
Fat 56g86%
Saturated Fat 6g38%
Trans Fat 0.2g
Polyunsaturated Fat 18g
Monounsaturated Fat 29g
Cholesterol 93mg31%
Sodium 1703mg74%
Potassium 887mg25%
Carbohydrates 68g23%
Fiber 8g33%
Sugar 5g6%
Protein 27g54%
Vitamin A 160IU3%
Vitamin C 7mg8%
Calcium 151mg15%
Iron 6mg33%
* Percent Daily Values are based on a 2000 calorie diet.

Sheet-Pan Fried Rice

This recipe is best with pre-planning, so you can cool the rice to give it the perfect texture. But even if you cook the rice fresh before making it, this meal is worth it. The four generous servings are packed with deliciousness.

Sheet-Pan Fried Rice

Prep Time1 hour
Cook Time30 minutes
Total Time1 hour 30 minutes
Course: Dinner
Cuisine: Asian, California
Keyword: Inspired by New York Times, Rice
Servings: 4 servings
Calories: 703kcal

Equipment

  • 1 Pressure cooker optional, for the rice

Ingredients

Rice (Make Ahead)

  • 200 g brown rice
  • 250 g water

Everything Else

  • 1 tsp salt
  • 2 tbsp soy sauce
  • 2 tbsp sesame oil
  • 1 onion finely diced
  • ½ cup neutral oil
  • 6 oz great mushrooms finely chopped
  • 4 cloves garlic minced
  • 1 inch ginger finely chopped
  • 1 tsp red-pepper flakes
  • 2 tbsp soy sauce
  • 16 oz frozen mixed vegetables do not thaw
  • 6 eggs
  • 2 scallions thinly sliced

Instructions

Rice

  • Do not rinse the rice. Add 200g rice and 250g cold water to the Instant Pot (or other pressure cooker). Add a tiny pinch of salt and mix well.
    200 g brown rice, 250 g water
  • If you do rinse the rice, account for the added water as part of the cold water. To do this, first measure the dry rice out to be 200g and measure the weight of the dry rice and inner pot of the Instant Pot. Remember that. Then rinse the rice and drain well. Add to the inner pot and put on the scale. Add enough water to equal a total of 250g above the weight of the dry rice and the Instant Pot weight. (Alternatively, subtract about 45 grams from the water per cup of rice.)
  • Cook on high pressure for 15 minutes. Then let pressure release naturally for 5 min. Then release remaining pressure. Check if rice is cooked and moisture has been absorbed. If it has, fluff and serve. If not, let steam release for a bit and it will likely solve itself.

Everything Else

  • Place a sheet pan on the middle oven rack and heat to 450 degrees.
  • In a large bowl, combine the cooled rice with salt, 2 tablespoons of the soy sauce, sesame oil and half of the diced onion. Toss to combine well. Remove the sheet pan from the oven, and spread the rice out evenly. Bake for 15 minutes.
    1 tsp salt, 2 tbsp soy sauce, 2 tbsp sesame oil, 1 onion
  • While that cooks, make the sauce. In a medium saucepan on medium-high heat, add 1 tbsp neutral oil and the remaining diced onion. Cook for 1 to 2 minutes until the onions start to soften, then reduce heat to medium and cook for 2 minutes more until translucent.
    ½ cup neutral oil, 1 onion
  • Add most of the remaining neutral oil except about 1 tbsp, along with the mushrooms, garlic, ginger, 2 tablespoon soy sauce, and red-pepper flakes. Reduce heat to medium-low and cook for 10 to 12 minutes, until the mushrooms are completely soft. If the oil bubbles too much, reduce the heat to low.
    ½ cup neutral oil, 6 oz great mushrooms, 4 cloves garlic, 1 inch ginger, 2 tbsp soy sauce, 1 tsp red-pepper flakes
  • After 15 minutes, remove the sheet pan from the oven, add the frozen mixed vegetables and toss with the rice to evenly distribute. Make 4 to 6 divots in the rice (depending on how many eggs you are using), drizzle a tiny bit of neutral oil into each divot to prevent sticking, and break an egg into each. Return to the oven for 6 to 10 minutes until the whites are set but the yolks are still runny.
    16 oz frozen mixed vegetables, 6 eggs
  • To serve, spoon some of the sauce over the rice and top with scallions. If the rice needs more seasoning, add more sauce or season with salt.
    2 scallions

Nutrition

Calories: 703kcal | Carbohydrates: 62g | Protein: 19g | Fat: 44g | Saturated Fat: 6g | Trans Fat: 1g | Cholesterol: 246mg | Sodium: 1754mg | Potassium: 719mg | Fiber: 8g | Sugar: 3g | Vitamin A: 6324IU | Vitamin C: 16mg | Calcium: 107mg | Iron: 4mg
Nutrition Facts
Sheet-Pan Fried Rice
Amount Per Serving
Calories 703 Calories from Fat 396
% Daily Value*
Fat 44g68%
Saturated Fat 6g38%
Trans Fat 1g
Cholesterol 246mg82%
Sodium 1754mg76%
Potassium 719mg21%
Carbohydrates 62g21%
Fiber 8g33%
Sugar 3g3%
Protein 19g38%
Vitamin A 6324IU126%
Vitamin C 16mg19%
Calcium 107mg11%
Iron 4mg22%
* Percent Daily Values are based on a 2000 calorie diet.

Baked Royal Corona Beans

This delicious preparation of Royal Corona beans is fantastic. The huge beans are well-flavored and taste great in the rich tomato sauce. Serve with bread, pasta, vegetables, rice, farro, etc. It pairs exceptionally well with a full-flavor feta.

Baked Royal Corona Beans

Prep Time30 minutes
Cook Time2 hours 30 minutes
Total Time3 hours
Course: Dinner
Cuisine: California
Keyword: Dry Beans, Inspired by Rancho Gordo
Servings: 6 servings
Calories: 389kcal

Ingredients

Beans

  • 1 lb Royal Corona beans
  • 1 onion peeled and cut in half
  • 2 bay leaves
  • 2 cloves garlic
  • 1 tsp peppercorn

Tomato Sauce

  • 3 tbsp olive oil
  • 1 medium yellow onion finely chopped
  • 4 cloves garlic minced
  • 2 tbsp tomato paste
  • 2 tsp oregano
  • 28 oz crushed tomatoes
  • ½ tbsp honey
  • 2 tsp salt

Instructions

Beans

  • Soak beans overnight in a huge bowl, covered, with 3 liters of water and 45 grams of salt.
    1 lb Royal Corona beans
  • Drain the beans. Place soaked beans in a large pot and cover with water by 3 inches. Add the halved onion directly to the pot; add the other bean spices to a small spice bag or a steeper. Bring to a boil and then turn the heat down to a bare simmer and cook until tender but holding their shape, which could be 30 minutes (highly unlikely) to 3 hours (also unlikely); probably around 2 hours total. Beans will be super creamy in texture when done. Add salt to taste just before the beans are finished cooking. When done, do not drain; set aside.
    1 onion, 2 bay leaves, 2 cloves garlic, 1 tsp peppercorn

Tomato Sauce

  • When the beans are done or nearly done, add the olive oil to a very large all-in-one pan or Dutch oven. Add the onion and cook until soft and browning; the trick is to let the onion sit for a bit once heated, so it develops some brown spots.
    3 tbsp olive oil, 1 medium yellow onion
  • Add the garlic, tomato paste and oregano. Mix well until aromatic.
    2 tbsp tomato paste, 2 tsp oregano, 4 cloves garlic
  • Add the tomatoes, sugar and salt and stir well. Let it simmer down some, but it should remain quite saucy. Taste for flavors here and add anything additional, like salt, pepper, more oregano, etc.
    28 oz crushed tomatoes, 2 tsp salt, ½ tbsp honey
  • Preheat the oven to 350ºF.
  • Drain the beans but reserve the liquid and discard the onion halves and other spices. Gently mix in the beans. If the mix is looking a little dry, add some of the bean water. You want the beans to be fully submerged and the sauce to be fairly liquid, as it will cook down in the oven further.
  • Bake for 30 minutes. Serve hot, at room temperature or cold.

Notes

Serves 6

Nutrition

Calories: 389kcal | Carbohydrates: 63g | Protein: 21g | Fat: 8g | Saturated Fat: 1g | Sodium: 1007mg | Potassium: 1884mg | Fiber: 15g | Sugar: 11g | Vitamin A: 384IU | Vitamin C: 17mg | Calcium: 257mg | Iron: 10mg
Nutrition Facts
Baked Royal Corona Beans
Amount Per Serving
Calories 389 Calories from Fat 72
% Daily Value*
Fat 8g12%
Saturated Fat 1g6%
Sodium 1007mg44%
Potassium 1884mg54%
Carbohydrates 63g21%
Fiber 15g63%
Sugar 11g12%
Protein 21g42%
Vitamin A 384IU8%
Vitamin C 17mg21%
Calcium 257mg26%
Iron 10mg56%
* Percent Daily Values are based on a 2000 calorie diet.

Stovetop Popcorn

Oil Options

  • Canola oil: neutral taste; tolerates high heat; goes with nearly any topping
  • Olive oil: familiar and typically light flavor; tolerates medium-high heat; goes with most toppings
  • Sesame oil: stronger taste that adds a unique flavor; tolerates high heat; coordinate with toppings
  • Coconut oil: traditionally used by movie theaters, but I’ve never tried it; tolerates high heat
  • Other oils: can be fun to experiment; oils with a high smoke point are best

Topping Options

The best part of homemade, stovetop popcorn is your toppings options are only limited by your tolerance for experimentation. Also, you and whoever you are enjoying this with can each add your own favorite topping, for a custom experience. Here are some options, but don’t feel limited by this.

  • Salt, especially if you have a seasoned salt, like a smoked salt or chili-lime salt
  • Melted butter and salt, for that classic movie-theater experience
  • Salt and black pepper
  • Zaatar (my husband’s favorite)
  • Salt, smoked paprika, pinch of cayenne or chipotle powder (my favorite, requires a spoon to eat)
  • Sweet drizzle: honey (1 tbsp), melted butter (2 tbsp), and cinnamon (1/4 tsp); mix together, then drizzle on top
  • Dulse (or other seaweed flakes / nori), and consider adding sesame seeds
  • Nutritional yeast (which I like sometimes, but not frequently)

Stovetop Popcorn

Cook Time15 minutes
Total Time15 minutes
Course: Snack
Cuisine: American, Mesoamerican
Keyword: Basics
Servings: 2 servings
Calories: 201kcal

Equipment

  • Large saucepot or other large (>6 quart) lidded pot, preferably one with a heavy bottom

Ingredients

  • ¼ cup popcorn kernels
  • 2 tbsp oil

Instructions

  • Add the 2 tbsp oil to a heavy-bottomed pot. Place just three popcorn kernels in the pot. Cover and heat over medium heat. After a few minutes, the kernels will pop, which is how you know the pot and oil is preheated.
    2 tbsp oil
  • Once you hear the kernels pop, turn off the heat and remove the pot from the burner. Add all of the remaining kernels of popcorn and cover the pot again with the lid. (No need to remove the popped kernels.) Gently shake and toss the pot for 10 seconds or so, the coat the kernels in the warmed oil.
    ¼ cup popcorn kernels
  • Wait 30-45 seconds – this is an important step in preheating the added kernels. Then place the pot back on the stove and turn the heat to medium. After another 2-5 minutes, the kernels will start popping.
  • Once they start popping, it will be done popping in 30-90 seconds. During that time:
    Gently shake the pot 2-3 times, while keeping it on/near the heat.
    Carefully lift one side of the lid to allow steam to escape. This step, done carefully, will lead to a crispier, better popcorn. But be careful, because the little popcorns come rocketing out with some force, so you want to tip the lid open just enough to allow a tiny bit of steam to get out.
  • Once you don’t hear popping for a few seconds, remove from heat and divide into large serving bowls. Immediately add your favorite topping (see reverse), toss well, and serve.

Nutrition

Calories: 201kcal | Carbohydrates: 15g | Protein: 2g | Fat: 15g | Saturated Fat: 1g | Trans Fat: 1g | Sodium: 1mg | Potassium: 56mg | Fiber: 3g | Sugar: 1g | Calcium: 1mg | Iron: 1mg
Nutrition Facts
Stovetop Popcorn
Amount Per Serving
Calories 201 Calories from Fat 135
% Daily Value*
Fat 15g23%
Saturated Fat 1g6%
Trans Fat 1g
Sodium 1mg0%
Potassium 56mg2%
Carbohydrates 15g5%
Fiber 3g13%
Sugar 1g1%
Protein 2g4%
Calcium 1mg0%
Iron 1mg6%
* Percent Daily Values are based on a 2000 calorie diet.

Vegan Chorizo

This fantastic replacement chorizo is not only a good simulacrum to meat-based chorizo, I think it tastes even better. It’s spicy, crunchy and flavorful. While it appears to be complicated, it is reasonable given the quantity you end up with is easily several servings. It goes well in burritos, tacos and bowls. Serve with other beans, veggies, avocado, or anything else.

Vegan Chorizo

Fantastic vegan alternative
Prep Time30 minutes
Cook Time1 hour
Bean Soaking Time8 hours
Total Time9 hours 30 minutes
Course: Ingredient
Cuisine: California, Mexican
Keyword: Dry Beans, Inspired by Joe Yonan, Vegan
Servings: 8 servings
Calories: 421kcal

Equipment

  • 1 pressure cooker
  • 1 large skillet
  • 1 bean or potato masher
  • 1 small food processor

Ingredients

Beans

  • 115 g garbanzo beans
  • Bean spices

Quinoa

  • 1 cup dried quinoa red preferred
  • cups water
  • ¼ tsp salt

Everything Else

  • ¾ cup walnuts
  • 2 dried ancho chiles
  • 1 tbsp ground chipotle chile
  • 1 tsp black pepper
  • 1 tsp dried oregano
  • 1 tsp ground cumin
  • 1 tsp ground coriander
  • ¼ tsp ground cloves
  • ½ cup bread crumbs panko-style
  • 4 cloves garlic minced
  • ¼ cup apple cider vinegar
  • 1 tsp soy sauce
  • 1 tsp salt smoked or kosher
  • cup neutral oil

Instructions

Beans

  • Rinse the beans. To soak them, add to a medium bowl along with 1 quart water and 2 tsp salt. Mix well. Set aside for at least 6 and up to 10 hours. Drain.
    115 g garbanzo beans
  • Place the beans in pressure cooker (electric or stovetop). Cover with about 1” water (a bit more if unsoaked). Add various bean spices (e.g., bay leaf, dried red pepper / pepper flakes, peppercorns, celery seed, garlic, onion) either in a spice bag or a metal steeper.
    Bean spices
  • Pressure cook for 7-10 minutes on high; for new and well-soaked beans, use 7 minutes, for shorter-soaked or older beans, go to 10 minutes. For completely unsoaked beans, cook up to 40 minutes. Allow pressure to release naturally for 25 minutes and then release any remaining pressure.
  • If beans are not fully soft, you can bring to pressure again for 1-2 minutes and then release pressure manually and that should finish them off. If they seem to need a lot more time, try cooking for an additional 1-2 minutes and then releasing pressure after 5-10 minutes.
  • Drain and set aside.

Quinoa

  • Heat a small saucepan over medium-high heat. Rinse the quinoa. Add the quinoa, a bit less than 1½ cups water and ¼ tsp of salt and stir well. Once it has come to a boil, reduce heat to medium-low, cover and cook until done and the quinoa has fully absorbed the water and is fluffy, about 35 minutes. If any liquid remains but the quinoa is cooked, leave uncovered while the heat stays on medium-low and occasionally (ever 2-3 minutes) stir it up so the steam can release. Once the water is fully absorbed, turn off the heat and leave uncovered.
    1 cup dried quinoa, 1½ cups water, ¼ tsp salt

Everything Else

  • Toast the walnuts on a large, heavy-bottomed dry skillet over medium heat, for about 5 minutes, stirring every minute or so to prevent scorching. Let cool and then chop or crush. Leave skillet for future steps.
    ¾ cup walnuts
  • Cut open the ancho chiles and discard the seeds and stem. Cut into ½” pieces and transfer to the small food processor. Add chipotle, pepper, oregano, cumin, coriander and cloves. Process until everything is finely ground.
    2 dried ancho chiles, 1 tbsp ground chipotle chile, 1 tsp black pepper, 1 tsp dried oregano, 1 tsp ground coriander, ¼ tsp ground cloves, 1 tsp ground cumin
  • Once the beans and quinoa are done, add the beans to a very large bowl. Mash the beans well. Add the quinoa and let cool for a few minutes (if fresh off the stove).
  • Stir all ingredients together except the oil. That is, add the chopped walnuts, spice mixture, the soy sauce and salt, breadcrumbs, minced garlic, and apple cider vinegar. Mix until everything is well-combined.
    ¾ cup walnuts, ½ cup bread crumbs, 4 cloves garlic, ¼ cup apple cider vinegar, 1 tsp soy sauce, 1 tsp salt
  • In a very large, heavy-bottomed skillet, heat ⅓ cup of neutral oil until it is hot and add half of the chickpea mixture. Stir as it cooks until it absorbs most of the oil. Spread it out and leave it undisturbed for a minute, then stir and scrape it around before spreading it out again. Repeat this process until it has developed darker color and is crispier, about 10 minutes total. Scoop into a bowl and repeat with the second half and another ⅓ cup oil.
    ⅔ cup neutral oil
  • Serve immediately or store in an air-tight container (for up to one week). It freezes well (up to three months).

Notes

Nutrition is for one of eight servings; it likely makes more than that, depending on what else you are eating with it.

Nutrition

Calories: 421kcal | Carbohydrates: 34g | Protein: 9g | Fat: 29g | Saturated Fat: 2g | Trans Fat: 1g | Sodium: 465mg | Potassium: 512mg | Fiber: 8g | Sugar: 6g | Vitamin A: 2638IU | Vitamin C: 4mg | Calcium: 64mg | Iron: 3mg
Nutrition Facts
Vegan Chorizo
Amount Per Serving
Calories 421 Calories from Fat 261
% Daily Value*
Fat 29g45%
Saturated Fat 2g13%
Trans Fat 1g
Sodium 465mg20%
Potassium 512mg15%
Carbohydrates 34g11%
Fiber 8g33%
Sugar 6g7%
Protein 9g18%
Vitamin A 2638IU53%
Vitamin C 4mg5%
Calcium 64mg6%
Iron 3mg17%
* Percent Daily Values are based on a 2000 calorie diet.
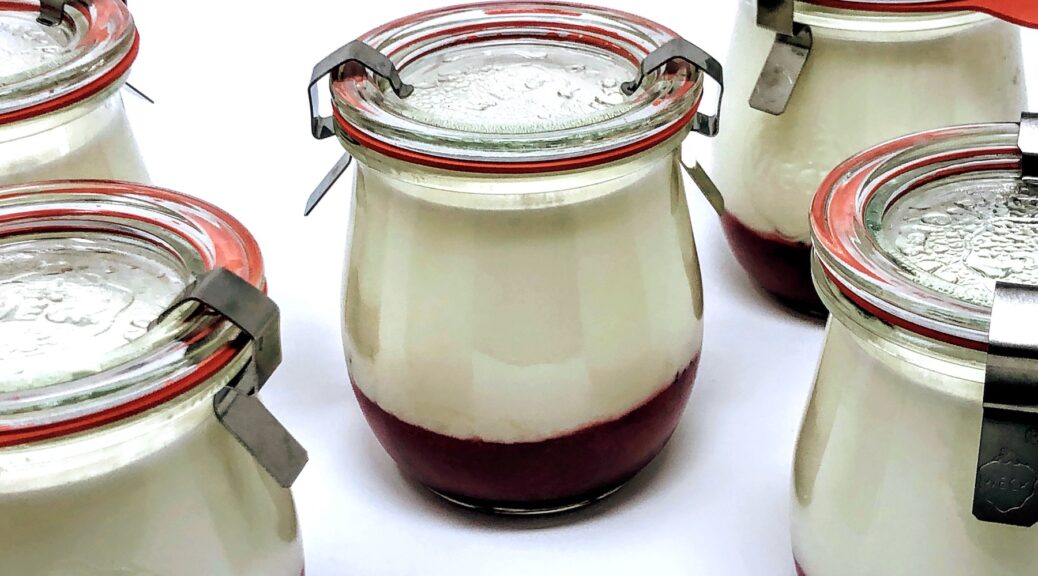
Homemade Yogurt

The yogurt pictured includes a fruit compote on the bottom, which is fantastic but not necessary. Another great way to add to this is topping with about 2 tbsp of granola or a teaspoon of honey.

The keys to homemade yogurt are to use the right ingredients and the right equipment for the right process. Ok, that’s true of any food, more or less. So what are the right versions of each?

  • Milk: The best milk is a non-homogenized, pasteurized whole milk. Ultra-pasteurized may not work well at all. And non-homogenized is fine, but appears to produce a less thick yogurt. And why would you use anything thinner than whole milk?
  • Starter: The best starter is one you’ve been culturing over time by saving a few tablespoons of each batch for use in the next batch, within about 2-3 weeks. If that starter does not seem to be working, you may need to try again with a new starter. If you’re buying a new starter, you have two big options. 1) Purchase a dry starter and follow the directions. 2) Purchase a plain, unsweetened full-fat yogurt. Find the best quality you can for that starter yogurt and it could last you a long time. I trust Straus yogurt anytime I need a starter because it does not contain thickeners.
  • Tools: Instant Pot does a fantastic job here. And these 762 Weck jars are the perfect size for a single serving. 2 Quarts of whole milk fill 10 of these jars to about the ¾ mark, with a few tablespoons leftover for culturing next time.

Homemade Yogurt

Simple, inexpensive and low-waste breakfast
Prep Time30 minutes
Cook Time6 hours
Total Time6 hours 30 minutes
Course: Breakfast
Cuisine: Simple
Keyword: Fermentation
Servings: 10 servings
Calories: 115kcal

Equipment

  • Instant Pot
  • Instant Pot loose-fitting lid
  • 10 Weck Jars (762)
  • Large bowl that can fit the inner pot to the IP
  • Food thermometer

Ingredients

  • 2 quarts whole milk
  • 2 tbsp yogurt starter
  • 4 cups ice for cooling

Instructions

  • First, pour the milk into the inner pot of the Instant Pot. Turn the Instant Pot to the "High" Yogurt setting, which will bring the yogurt to boiling temperature for 1 minute and then end. This takes about 10-20 minutes, though I've never timed it. Keep covered and stir occassionally with a very clean instrument (not wood – use either metal or silicone).
  • While that happens, prepare an ice bath to cool the yogurt by adding ice to a very large bowl.
  • Once milk has boiled, remove the inner pot carefully and place in the ice bath. Add some cold water to allow the inner pot to submerge slightly, if needed. Stir the milk and periodically check the temperature until it reaches about 110ºF.
  • Remove about ½ cup of milk to a smaller bowl or 2-cup measuring cup. Add the culture and stir well until disolved. Add this back to the larger pot and stir well.
  • Dry the outside of the inner pot thoroughly, so as to not damage the Instant Pot. Place this back in the Instant Pot. Set the Instant Pot to medium yogurt setting and allow to ferment, with the lid on, for somewhere between 4-8 hours. With the Straus culture, after the first time, it takes about 6 hours. You are looking for the yogurt to be thick and for it pull from the sides nearly in a block if you lift and tilt the inner pot to one side. It should have a slight nearly clear, liquid layer on the top.
  • Cover well (consider using a sealing lid or wrap of some kind) and then place in the fridge to cool for several hours to further firm up. When cooled, transfer to the weck jars, but make sure to save at 2-3 tbsp separately for the next time you make yogurt.

Nutrition

Calories: 115kcal | Carbohydrates: 9g | Protein: 6g | Fat: 6g | Saturated Fat: 4g | Cholesterol: 19mg | Sodium: 86mg | Potassium: 250mg | Sugar: 10g | Vitamin A: 307IU | Calcium: 217mg | Iron: 1mg
Nutrition Facts
Homemade Yogurt
Amount Per Serving
Calories 115 Calories from Fat 54
% Daily Value*
Fat 6g9%
Saturated Fat 4g25%
Cholesterol 19mg6%
Sodium 86mg4%
Potassium 250mg7%
Carbohydrates 9g3%
Sugar 10g11%
Protein 6g12%
Vitamin A 307IU6%
Calcium 217mg22%
Iron 1mg6%
* Percent Daily Values are based on a 2000 calorie diet.

Four Focaccia

The best timing is probably this: make the biga one early evening (6-7pm) on a Friday or Saturday. And then you can make the dough the next morning. When you mix the dough (second step), you can leave out one portion (one-quarter, about 14 ounces) and proceed through the steps with that one until you bake it about 5 hours later. The other three-quarters (42 ounces / 2lbs, 10oz) can go into the fridge for a long, cold bulk ferment. Then, each morning, you can remove another portion (14oz) and place into the square pan with olive oil, to warm up and stretch to the edges. Then you can bake after about 2 hours.

Four Focaccia

Prep Time40 minutes
Cook Time20 minutes
Rising Time21 hours
Total Time22 hours
Course: Bread, Side Dish
Cuisine: Comfort Food, Italian
Keyword: Basics, Bread
Servings: 16 servings
Calories: 236kcal

Equipment

  • Closable large container for dough

Ingredients

Biga

  • 6.4 oz bread flour
  • 3.8 oz water
  • tsp instant dry yeast

Second portion

  • 25.6 oz bread flour
  • 19.6 oz water
  • 0.6 oz salt about 1 tbsp
  • 0.13 oz instant dry yeast about 1.25 tbsp
  • 4 tbsp olive oil for greasing the pan

Instructions

First Day / Evening

  • First, make the biga a day before. Gently mix the yeast into the water, warmed to about 70ºF. Slowly add in the flour and mix until just smooth. It should be stiff and dense, but you can add a few drops of water if it seems overly dry. Cover the bowl tightly and leave for 12 to 16 hours at about 70ºF. You will know it’s ready because it should be domed and just beginning to fall in the middle.

Second Day / Morning

  • Second, prepare the final dough. Add the dry “second portion” ingredients to a stand mixer, mix with the paddle, and then add about half of the water at about 72-75ºF and mix for 3-5 minutes in order to incorporate the ingredients. As it comes together, switch to the dough hook and begin adding the biga in chunks. Mix on second speed for several minutes, at least 5 min, to develop dough strength. You’re looking for a dough that is developing strong gluten. It will be fairly dry at this point. Once you have good strength going, add the remaining water by pulling the dough off the dough hook and pouring the water in there. Mix until the water is incorporated.
  • At this point, you can take one fourth of the dough (about 13 ounces) and proceed through the steps, while the other three-fourths can be cold fermented for up to a few days. (See notes at top.) For the cold ferment, it may be valuable to still fold in the container once or twice, as the dough cools.
  • For the portion you are baking in the same day, put into a large, flat, shallow container, like the glass baking pan (which you can cover with plastic wrap or waxed canvas). Fold every 45 minutes, for three folds over three hours (with 45 minutes after the last fold, too).
  • At the end of the bulk ferment (regular or cold), remove the dough to a lightly floured work surface. Gently shape into an 8” square, the size of your pan, without pushing out too much air. Cover briefly – or cover and allow to sit if you’re unable to stretch it to full size right away. In order to get it to stretch, you may need to let it rest for a bit, especially if you’re doing this after the cold ferment.
  • Once the dough is the right size, prepare the 8” square metal pan by adding a little over 1 tbsp olive oil to the pan and swirl around to coat the bottom and sides of the pan. Gently place the fermented dough into the pan and make sure it reaches the edges. Allow to rise for 2-2.5 hours.

Bake

  • Pre-heat the oven to 500ºF. Spray the top of the bread gently with olive oil. Gentle press your fingers into the top of the dough to make dimples. Sprinkle the top with sesame seeds and salt.
  • Bake for 12-15 minutes. When done, the top will be golden and the dough will have pulled from the sides of the pan appealingly. The sides and bottom should be closer to brown or golden brown. Allow to cool briefly and then cut and serve.

Notes

Each serving is ¼ of a square, if you’ve made four focaccia as instructed

Nutrition

Calories: 236kcal | Carbohydrates: 41g | Protein: 7g | Fat: 4g | Saturated Fat: 1g | Sodium: 415mg | Potassium: 57mg | Fiber: 1g | Sugar: 1g | Vitamin A: 1IU | Calcium: 10mg | Iron: 1mg
Nutrition Facts
Four Focaccia
Amount Per Serving
Calories 236 Calories from Fat 36
% Daily Value*
Fat 4g6%
Saturated Fat 1g6%
Sodium 415mg18%
Potassium 57mg2%
Carbohydrates 41g14%
Fiber 1g4%
Sugar 1g1%
Protein 7g14%
Vitamin A 1IU0%
Calcium 10mg1%
Iron 1mg6%
* Percent Daily Values are based on a 2000 calorie diet.