Classic Umami Gravy

This gravy works really well and can even tolerate some improvisation. The key components are here though, so don’t alter it too much. You really do need the fennel and celery seed to give it a nice sausage-like flavor, and the miso helps add important umami.

Classic Umami Gravy

Prep Time10 minutes
Cook Time20 minutes
Total Time30 minutes
Course: Ingredient, Side Dish
Cuisine: American, Southern
Keyword: Sauces
Servings: 10 servings
Calories: 56kcal

Ingredients

  • 1 small yellow onion minced
  • 3 tbsp unsalted butter
  • 2 tsp fennel seeds crushed
  • 1 tsp celery seeds crushed
  • 1 pinch cayenne pepper
  • 2 tbsp flour
  • ¾ cup vegetable broth
  • ¾ cup milk
  • 1 tbsp miso
  • 1 tsp good-quality soy sauce or tamari

Instructions

  • Melt the 3 tbsp butter in a saucepan. Sauté the onion until it softens, about 3-5 minutes. Add the spices (fennel, celery seed, thyme and cayenne) and cook for 1-2 minutes until fragrant.
    1 small yellow onion, 3 tbsp unsalted butter, 2 tsp fennel seeds, 1 tsp celery seeds, 1 pinch cayenne pepper
  • Add the 2 tbsp flour and mix constantly for 4-7 minutes until the color turns medium brown.
    2 tbsp flour
  • Reduce the heat to medium low. Add the vegetable broth, miso and soy sauce and stir until smooth and thickened, a few minutes.
    ¾ cup vegetable broth, 1 tbsp miso, 1 tsp good-quality soy sauce or tamari
  • Drizzle in the milk slowly and mix well to ensure it all incorporates well. Stir until somewhat thickened, about 5-7 minutes. It will thicken more as it cools.
    ¾ cup milk
  • Remove from the heat. Taste and add salt, pepper and other seasonings as needed.

Notes

Makes 10 servings

Nutrition

Calories: 56kcal | Carbohydrates: 4g | Protein: 1g | Fat: 4g | Saturated Fat: 3g | Trans Fat: 1g | Cholesterol: 11mg | Sodium: 177mg | Potassium: 52mg | Fiber: 1g | Sugar: 1g | Vitamin A: 179IU | Vitamin C: 1mg | Calcium: 33mg | Iron: 1mg
Nutrition Facts
Classic Umami Gravy
Amount Per Serving
Calories 56 Calories from Fat 36
% Daily Value*
Fat 4g6%
Saturated Fat 3g19%
Trans Fat 1g
Cholesterol 11mg4%
Sodium 177mg8%
Potassium 52mg1%
Carbohydrates 4g1%
Fiber 1g4%
Sugar 1g1%
Protein 1g2%
Vitamin A 179IU4%
Vitamin C 1mg1%
Calcium 33mg3%
Iron 1mg6%
* Percent Daily Values are based on a 2000 calorie diet.

Vegetarian Cassoulet with Bean Sausages

This is an interesting meal. It makes a lot of a very high-fiber meal. I would only recommend making it once per year.

Vegetarian Cassoulet with Bean Sausages

Prep Time4 hours 30 minutes
Cook Time2 hours
Total Time6 hours 30 minutes
Course: Dinner
Cuisine: California, Vegan
Keyword: Dry Beans, Stews
Servings: 8 servings
Calories: 312kcal

Ingredients

  • ½ lb cassoulet beans
  • 3 tbsp olive oil
  • 1 bulb fennel cleaned and sliced
  • 1 large leek cleaned and thinly sliced
  • 4 cloves garlic minced
  • 1 large yellow onion chopped
  • 3 stalks celery diced
  • 3 large carrots diced
  • ½ tsp salt
  • 1 tsp smoked paprika
  • 15 oz diced tomatoes
  • 1 tbsp tomato paste
  • 1 tbsp miso
  • 1 farcelette or dried herb bundle with bay leaf
  • 3-4 sprigs sage thyme, sage, rosemary
  • 2 cups vegetable stock
  • 6 bean sausages optional yet important

Instructions

  • Make the bean sausages the day before. Store in the fridge to firm up.
  • Soak beans all day in salted water. Drain and add water to a medium saucepan. Add the beans and bring to a gentle boil and then turn down to low. Check after 20 minutes and if the beans are getting relatively soft, turn off the heat and set aside. You want to soften the beans substantially but not fully cook them.
    ½ lb cassoulet beans
  • Preheat the oven to 350ºF.
  • In a Dutch oven, cook the vegetables with plenty of olive oil over medium-high with just a pinch of salt until softened and starting to take on some brown color, 5-8 minutes.
    3 tbsp olive oil, 1 bulb fennel, 1 large leek, 4 cloves garlic, 1 large yellow onion, 3 stalks celery, 3 large carrots, ½ tsp salt
  • Add 1 tsp smoked paprika and stir. Add the tomato paste and miso and mix well. Add the tomatoes and cook for a bit longer until everything is well-combined.
    1 tsp smoked paprika, 1 tbsp tomato paste, 1 tbsp miso, 15 oz diced tomatoes
  • Add the vegetable stock, farcelette (dried herb bundle) and the fresh herb sprigs. Mix. Add the drained, soaked beans. Bring to a simmer, ensuring there is plenty of liquid to cover the beans and allow absorption for the beans. Add a bit of vegetable stock or water if needed.
    1 farcelette, 2 cups vegetable stock, 3-4 sprigs sage
  • Once simmering well, cover and transfer to the preheated oven. Bake, covered, for 1-2 hours. Check every 30 minutes or so to ensure the beans are well-covered in liquid and then, after an hour, the doneness of the beans. Beans should cook in about 60-90 minutes.
  • As the beans approach being done, prepare the sausages. Slice on a diagonal into 1” or ½” pieces. Pan-fry in a few tbsp oil until they’ve developed a nice crust.
    6 bean sausages
  • Once beans have cooked, uncover the dish and add the fried sausages on top. Gently press sausage pieces into the soup. Bake, uncovered, for another 15-30 minutes to allow the sausages to flavor-meld with the soup and for some of the remaining liquid to cook off.
  • Remove from the oven and carefully remove the herb bundle and herb sprigs. Allow to cool some and then serve with a crusty bread.

Notes

Serves 8

Nutrition

Calories: 312kcal | Carbohydrates: 50g | Protein: 16g | Fat: 7g | Saturated Fat: 2g | Cholesterol: 201mg | Sodium: 927mg | Potassium: 940mg | Fiber: 11g | Sugar: 9g | Vitamin A: 5392IU | Vitamin C: 16mg | Calcium: 172mg | Iron: 7mg
Nutrition Facts
Vegetarian Cassoulet with Bean Sausages
Amount Per Serving
Calories 312 Calories from Fat 63
% Daily Value*
Fat 7g11%
Saturated Fat 2g13%
Cholesterol 201mg67%
Sodium 927mg40%
Potassium 940mg27%
Carbohydrates 50g17%
Fiber 11g46%
Sugar 9g10%
Protein 16g32%
Vitamin A 5392IU108%
Vitamin C 16mg19%
Calcium 172mg17%
Iron 7mg39%
* Percent Daily Values are based on a 2000 calorie diet.

Bean Sausages

Jump to Recipe

I’ve made this several times, including just recently for the first time in a while. The recipes takes quite a long time, but it’s not very difficult and some of the time is inactive, so you can prep other side dishes or do the dishes along the way. Given the cooling time to really make this great, it is probably best made in the morning for an evening dinner, or even the day before.

This makes 6 sausages, and the serving size is probably 2 per person, if you also serve it with sides and bread, for example. You may want to double the recipe, like I usually do, to really get the most out of the time spent on it. You can’t really more than double it and still have it fit into the pressure cooker for the final step.

If you forget to soak the beans, you can quickly soak them as you prep the other ingredients for the first cooking and turn the cooking time to about 12 minutes (for black-eyed peas) and add a total of 1 cup water or vegetable stock (instead of 1/2 cup) and it will work great. Just be sure to drain off extra liquid before mashing the beans.

I have switched up the spices a few times and it has worked great. Don’t go overboard with spices – never more than about 1 tsp of anything aromatic and less than ½ tsp of hot spices (i.e. chipotle). You don’t want to overwhelm the other flavors. The crushed fennel seeds are pretty much mandatory – it gives it a recognizable sausage flavor that’s really delicious.

Bean Sausages

Delicious, healthy homemade bean sausages.
Prep Time15 minutes
Cook Time1 hour 30 minutes
Total Time1 hour 45 minutes
Course: Main Course
Cuisine: Vegetarian
Keyword: Dry Beans, Substitutes
Servings: 6 sausages
Calories: 151kcal

Equipment

  • Pressure cooker
  • Steamer basket (for pressure cooker)

Ingredients

First Step

  • ¾ cup black-eyed peas or other mashable bean, like black or garbanzo, soaked and drained
  • 1 cup shiitake mushrooms diced
  • 1 red onion small, diced
  • ½ cup vegetable stock or water or 1 cup, if beans are unsoaked

Second Step

  • ⅓ cup all-purpose flour
  • 2 tbsp wheat gluten or 2 tbsp ground chia or flax seeds
  • 2 tbsp nutritional yeast
  • 1 tbsp tomato paste
  • 2 tbsp balsamic vinegar or tamari
  • 1 tbsp Worcestershire sauce vegan – this can be replaced with 1 tbsp miso, or maybe 1-2 tsp amino acids, or another 1 tbsp tomato paste
  • 2 tsp Italian seasoning or up to 1 tbsp of some or all of the following spices: basil, oregano, marjoram, parsley, thyme, summer savory, rosemary, garlic, onion
  • 1 tsp smoked paprika
  • 1 tsp fennel seeds ground or crushed (for less than 1 tsp total once crushed)

Optional

  • 1 tbsp miso paste add a touch more flour if you add this
  • ½ tsp chipotle powder
  • 1 tsp cumin

Instructions

First Step

  • If you have soaked the beans already for a few hours, then you can skip right to the next step. If you have not, I would recommend rinsing the beans and adding to about 3 cups water along with an optional 1 tsp salt. Set aside until the rest is prepped.
  • While the beans soak, clean and mince the mushrooms and small red onion. Also crush or mince the garlic. Heat a stovetop pressure cooker on the stove to medium heat or turn your electric pressure cooker to sauté on medium. Add the mushrooms and onion and dry sauté for 2 minutes, stirring fairly frequently. If it gets stuck to the bottom, that’s ok, but try to scrape some off before it burns. You want some of the browned/burned bits, for their umami power, but you don’t want anything fully burned.
  • Add the garlic and stir. Then add the drained beans and ½ cup water or vegetable stock (if beans soaked for hours already) or 1 cup water or vegetable stock (if the beans only briefly soaked).
  • Lock on the lid and bring to high pressure for 6 minutes (if beans were pre-soaked for hours) and up to 12 minutes (if beans were not pre-soaked for long). Allow pressure to release naturally. Test a few beans to make sure they are fully cooked. If not, re-pressurize for 2-3 minutes and allow pressure to release naturally. [While the beans cook, you can measure out and prepare all of the ingredients listed in the second step. Dry ingredients can be combined in one cup, and wet ingredients can be pre-combined in another cup. Set aside for later.]
  • Once beans are fully cooked, drain any remaining liquid and transfer to a medium bowl to cool. While the beans cool, clean out the pressure cooker pot and at least rinse the cooker top and silicon ring. (You will be reusing this to cook the sausages under pressure.)
  • Once beans are cooled (5-15 minutes), mash the beans with a fork, a potato masher or your hands. It shouldn’t be like smooth, but you also want very few or no whole beans left.

Second Step

  • Add in the “second step” and “optional” ingredients, mixing frequently with a spatula or fork as you add them, to ensure you get a well-mixed paste. Let this sit for at least 5 minutes, for the flour to absorb the liquid. It will be a fairly sticky and rough paste and it should be able to form shapes well by the time you’re done. For example, you should be able to make a rough ball with it and it shouldn’t fully deflate into a flat oval, even if it flattens just a bit. If it seems too wet, add just a bit more flour to make it a drier, more formed consistency. The next step will firm it up further, so you shouldn't expect it to be quite as dry or cohesive as, let's say, a black bean burger patty or falafal.
  • While that sits, prepare your aluminum foil (and optional parchment paper) by cutting into squares that are about 5”x7” – but that’s a rough estimate. I’d say at least 3” by 6” is the minimum size, but you may want a larger square to make it manageable. I have used parchment before as an “inner” liner and I find it doesn’t make much difference for the final result, so I skip that now. (I know some people dislike their food touching aluminum – I respect everyone has their own preference there. The science I’ve read says it doesn’t matter, but who knows.)
  • Divide the mixture into 6 portions on top of the aluminum foil or parchment paper. Shape into rough sausage shapes and roll the wrapper around it, folding or twisting the ends to contain and hold the the sausage shape. The aluminum foil will help hold the shape in the pressure cooker, so use it as the outer wrapper if you used parchment paper as the inner liner. I don’t have an exact strategy for the ends – twist or fold – but I think folding carefully probably provides the best shape.
  • Once you have them all shaped, add 1 cup water to the bottom of the pressure cooker and place the steamer basket or rack in the pressure cooker. Carefully place the wrapped “sausages” in the cooker, layering them on top of each other. I can usually place 3-4 on each layer, and then I switch the orientation for the next layer so they’re alternating. I’ve never tried it another way, but this works for me.
  • Lock the lid on the pressure cooker and bring to pressure for 10 minutes. Allow pressure to release naturally. Remove the lid (carefully, as always) and let cool for a few seconds.
  • Carefully remove the sausages from the pressure cooker and unwrap gently. You may want to let them cool for another few minutes, so it’s easier to unwrap them.
  • For the firmest sausages, refrigerate for at least 3 hours or overnight. I have refrigerated in the wrappers and out of the wrappers. Both methods work fine for me.
  • To heat and crisp the sausages, add them to a pan with a few tbsp of a neutral oil (less oil if you use a nonstick pan) and pan fry them over medium or medium-high for about 8-10 minutes total, with 2-3 minutes per side. Mine usually brown up quite a bit and develop a nice outer layer.

Serving

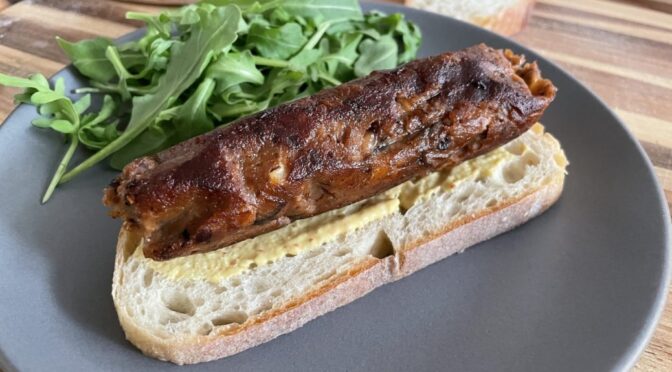
  • Serve with a great mustard, maybe over a nice slide of bread. Other suggestions for serving include sliced in a soup, or with baked beans, or in a hotdog bun or naan with traditional sausage fixings, like caramelized onions and relish.

Nutrition

Calories: 151kcal | Carbohydrates: 27g | Protein: 10g | Fat: 1g | Saturated Fat: 1g | Sodium: 268mg | Potassium: 523mg | Fiber: 5g | Sugar: 5g | Vitamin A: 328IU | Vitamin C: 3mg | Calcium: 55mg | Iron: 3mg
Nutrition Facts
Bean Sausages
Amount Per Serving
Calories 151 Calories from Fat 9
% Daily Value*
Fat 1g2%
Saturated Fat 1g6%
Sodium 268mg12%
Potassium 523mg15%
Carbohydrates 27g9%
Fiber 5g21%
Sugar 5g6%
Protein 10g20%
Vitamin A 328IU7%
Vitamin C 3mg4%
Calcium 55mg6%
Iron 3mg17%
* Percent Daily Values are based on a 2000 calorie diet.
Tofu, Broccoli and Rice (Hainanese-Inspired)

This requires some work the day before or in the morning, to create a good ginger scallion sauce and also to marinate the tofu.

Tofu, Broccoli and Rice (Hainanese-Inspired)

Like "Rooster & Rice" – a simple delight
Prep Time30 minutes
Cook Time30 minutes
Marinating Time1 day
Total Time1 day 1 hour
Course: Dinner
Cuisine: Chinese
Keyword: Rice, Tofu
Servings: 2 servings
Calories: 1017kcal

Ingredients

Ginger scallion sauce

  • 3 tbsp light oil canola, grapeseed
  • 2 tbsp scallions minced
  • 1 inch fresh ginger 1 tbsp minced or 2 tbsp grated
  • 1 tbsp soy sauce

Tofu

  • 1 tbsp sesame oil
  • 4 tbsp soy sauce
  • 2 tbsp mirin rice wine
  • 1 tbsp rice wine vinegar
  • 1 tbsp grated fresh ginger
  • 20 oz firm tofu 2 Hodo Soy packages

Rice

  • 2 cloves garlic minced
  • 1 inch fresh ginger 1 tbsp minced or 2 tbsp grated
  • 1 cup long-grain rice basmati
  • 1½ cup vegetable or no-chicken stock

Broccoli

  • 1.5 lb broccoli
  • Water or vegetable stock

Serving

  • 1 tbsp Sambal oelek or sriracha

Instructions

Ginger scallion sauce

  • Mince the green onion. Mince or grate the fresh ginger. Add to a storage container (like a Mason jar) along with the 3 tbsp oil and 1 tbsp soy sauce. Allow to marinate for at least one hour and up to one week.

Tofu

  • Marinate the tofu in advance by mixing all of the liquid and ginger ingredients together in a sealable container. Slice the tofu into bite-size cubes and pat dry. Add to the marinade and toss to coat. Cover and refrigerate for up to a full day.
  • When ready, heat 2 tbsp of a high-heat oil over medium-high heat in a large straight-sided pan or Dutch oven. Once the oil is hot, add the tofu in one layer. Cook for a few minutes on each side without disturbing before flipping, aiming for a light-brown, crisp exterior on each side.

Rice

  • In a large soup pot that fits a strainer attachment (you’ll see why later) over medium heat, add a few tsp oil and the 2 cloves minced garlic and minced or grated ginger. Fry a bit. Rinse the 1 cup rice thoroughly, then add the drained rice to the pot and stir well for 1-2 minutes.
  • Move the ginger, garlic and rice mix to a rice cooker and add 1½ cup vegetable stock. Cook until done. (Do not clean the large pot.)

Broccoli

  • To steam the broccoli, add 1” water or stock to the pot where the rice was briefly fried. Bring to a boil.
  • As it comes to a boil, chop the broccoli so you have large bite-size pieces. Once the water/stock is boiling, add the broccoli to a steamer basket and place on/in the pan.
  • Cover and steam for 5-6 minutes. Try to time this so it’s the final step as the rice and tofu are finishing, or even after they finish so the broccoli is very freshly steamed.

Assemble & Serve

  • Once the tofu, rice and broccoli are done, assemble in a bowl (recommended) by placing the rice on the bottom, with fried tofu on one side and broccoli on the other. Top with drizzles of the ginger scallion sauce and the sambal oelek, as desired.

Notes

Makes 2 very large servings, or 3-4 smaller servings

Nutrition

Calories: 1017kcal | Carbohydrates: 118g | Protein: 47g | Fat: 43g | Saturated Fat: 6g | Sodium: 3652mg | Potassium: 1359mg | Fiber: 13g | Sugar: 13g | Vitamin A: 2565IU | Vitamin C: 311mg | Calcium: 562mg | Iron: 8mg